
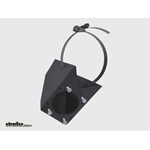
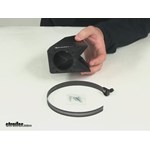
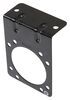
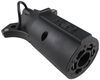
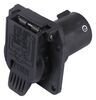
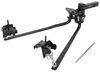
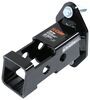
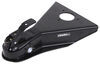
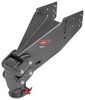
6 and 7-Way Trailer Connector Mounting Box for Round or Square Tube Hitches
(97 reviews)
Price: $27.05
6 and 7-Way Trailer Connector Mounting Box for Round or Square Tube Hitches
Retail:$34.34
Our Price: $27.05
You Save: 21%
Orders above $99 qualify for Free Shipping
Thank you! Your comment has been submitted successfully. You should be able to view your question/comment here within a few days.
Error submitting comment. Please try again momentarily.


In-stock alternatives that can ship today


- All Info
- Reviews (97)
- Q & A (0)
- Videos (3)
- Photos
Draw-Tite Accessories and Parts
- Trailer Wiring
- Mounting Hardware
- Brackets
- 6 Round
- 7 Round
- Draw-Tite
- Designed for 6 and 7-Way Connectors
- Fits Hitches with Round or Square Cross Tubes
- Mounting box has cutout that can be trimmed to fit round cross tubes
- Compact and Professional Appearance
- Corrosion Resistant Materials
- Easy Installation on New or Pre-wired Vehicles
- Includes Screws to Mount the Connector


118159 6 and 7-Way Trailer Connector Mounting Box for Round or Square Tube Hitches
Item # 18159


Video of 6 and 7-Way Trailer Connector Mounting Box for Round or Square Tube Hitches


Videos are provided as a guide only. Refer to manufacturer installation instructions and specs for complete information.


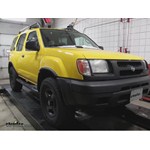
Video Transcript for Trailer Brake Controller Installation - 2001 Nissan Xterra
Today on this 2001 Nissan Xterra we're going to install part number 90195 from Tekonsha, the P3 brake controller. To install our brake controller we're also going to use part number ETBC7 to install it, and we're going to work with that part number first. We're going to take the seven pole adapter and connect that to the gray cable in the kit. We'll use the butt connector to make our connections, and we'll use the color code as follows: We're going to go black to black, and white to blue. Our black wire will be used for our 12 volt power supply going out to the seven pole connector, and our blue wire will be our brake controller output. Now that blue wire is going to change from blue to white and then it will go back to blue eventually at the brake controller.
We'll go ahead and tape our wires up and we'll also use the loom material that comes with it to help protect the wires and make it look nice. Now we're going to need an extra bracket to mount this to our hitch on our vehicle. The bracket we're going to use is part number 18159. This bracket is designed to work with square or round hitches. In this case, we've got a round hitch to deal with so we're going to go ahead and cut out along the marks on the inside of the bracket to make it fit a round hitch.
Now we'll go ahead and take our wires and thread it through the bracket. Then we'll go ahead and use the hardware that comes with the ETBC7 kit to attach it to our bracket. Now it's a good idea to drill out the holes first before we install our hardware since the hardware won't fit in the holes already drilled in the bracket. Then we'll go ahead and install the hardware. We'll install the bolts from the outside to the inside.
Then we'll install the nuts on the inside of the bracket. Now, two of the bolts will be really hard to get to, to get the nuts started. So, as a tech tip, we're going to use a magnetic pick-up tool to actually hold the nut for us while we thread it into place. OK. At this point we've got our seven pole connector and our bracket connected together.
We'll go ahead and attach it to the hitch. The bracket comes with a clamp that we'll run around the hitch and through the bracket. Then we'll tighten it down. We'll cut off the excess part of the clamp and tuck it inside the bracket. Now we'll go ahead and connect our four pole from our seven pole connector to the pre-existing four pole on our vehicle. We'll go ahead and use some dielectric grease to help protect the pins and the contacts. We'll tape it together and also use a zip tie to help make it a semi-permanent connection. Then we'll go ahead and route our wire over the spare tire over to the passenger side. Once we're over to the passenger side, we'll go ahead and take the white wire with the ring terminal and run that to the body underneath. That will be our ground. Then we'll go ahead and zip tie the wire as best we can to the hitch and anything else behind the bumper. Then we'll go ahead and run our gray wire up towards the front of the vehicle towards the battery. We're going to run our wire along the frame and also along the parking brake cable going up to the front, and we'll zip tie as we need to secure the wire. Now when we run it to the engine compartment, we'll go ahead and keep the wire hidden behind the heat shield. Then we'll run it up the side of the firewall and zip tie as need to keep it in place. We'll take our gray cable and route it up to the battery. Now at this point we can tell we're not going to have enough cable to go from the battery to the brake controller eventually. We're going to take the covering from the gray cable and strip it back the rest of the length starting by the circuit breaker and working our way towards the end of the cable. With the gray sheath removed from the wires, we'll go ahead and leave them alone for now, and then we'll install our circuit breakers. We're going to install a 40 amp circuit breaker and our 20 amp circuit breaker. The 30 amp breaker in the ETBC7 kit will not be used. So, our black wire, we'll go ahead and run it to the circuit breaker, our 40 amp, and we're running it to the silver post on the breaker, and then the copper post will eventually be ran to the battery. So we'll make our connections to the circuit breaker and run it to the positive posts of the battery, but we will not make an electrical connection to the battery yet. We'll save that for last. Now our white wire, we're going to run that over the top of the engine compartment over to the drivers side. Now well leave the wire alone for there and were going to locate the grommet were going to eventually push the wires through. We're going to use a screwdriver to make a hole in the grommet and then use a piece of airline tubing to help pull our wires through. Now there'll be three wires that will be going through. There will be our white wire that we just pulled over. We're going to pull that through the grommet, and then we're going to get an additional length of the gray cable, and the part number for the extra length of cable will be etbcxw. We're going to combine that with the white wire and pull that through our grommet. We'll go ahead and pull all three wires through the grommet and to the inside of the vehicle. Now we'll go ahead and take the remaining part of our cable that's in the engine compartment and run it back over to our battery. We're going to run it through the 20 amp circuit breaker just like we did before. The wire that will go to the brake controller will go to the silver post and then the rest of the wire from the copper post will go to the battery. And once again, we'll put it in on the wire, but we will not connect it to the battery. And, our white wire will eventually go to the negative side of the battery for ground. Next we'll go ahead and take that cable and zip ties and we'll secure it to the firewall. Now we'll go back inside the vehicle and get underneath the dashboard on the drivers side. At this point we're going to look for our brake signal. We're going to follow the brake pedal up to the brake switch and test our wires. Now our brake wire looks like a light brown color with a red stripe and silver bands. We'll use a quick splice connector from the ETBC7 kit to make our connection. Now the wire that we're going to connect to our brake light switch is going to be the wire harness from our brake controller. Now we'll go ahead and connect the rest of our wires from our brake controller harness. We'll start off with our blue wire. That's going to be hooked up to our single white wire that was ran to the seven pole connector connected to blue, and the other two wires still in the gray cable we'll hook up color for color; white to white and black to black. We'll use the supplied butt connectors to make our connection and then go ahead and tape them up. Now I'm going to take our brake controller bracket and mount it to the bottom of the dash. The two screws that come with it will go right into the plastic and hold it secure. And then we'll take two machine screws that come with the brake controller and we'll attach the brake controller to the bracket. Once those two screws are started we'll go ahead and tighten them down for good and then we'll get underneath the dash one more time and zip tie our wires up and make sure they are safe and out of the way. Now we'll go back to the battery on the vehicle and we'll make up our final connections. Our two black wires will go to the positive side of the battery and we'll go ahead and trim the cap on the terminal to make room for our wires. And, then our lone white wire, that will go to the negative side of the battery, and we're going to use an extra nut to hold it in place. We're going to use a 6 mm with a 1.0 thread pitch and that's going to be part number 185916. With all the connections made, we'll go ahead and take a look at the brake controller. Now we should see a red indication that says no trailer hooked up. Now we'll go ahead and plug the trailer into the vehicle we'll notice how it changes. You can see the screen will show a truck and a trailer icon so we know we have a good connection. Now we'll go ahead and move the manual override to make sure that works and we can see how the numbers go up in value. And, then we'll go ahead and push on the brake pedal. That will give us a small number, in this case a little over two, and it looks like we've got signal from our brake pedal. So with our initial tests, it looks like our brake controller is ready to go. And, with that, that will finish it for our install of part number 90195, the Prodigy P3 brake controller on our 2001 Nissan Xterra.
Customer Satisfaction Score:
99% were satisfied with this product
1% of customers were not satisfied
- etrailer mistake
- Wrong item was ordered
Customer Reviews
6 and 7-Way Trailer Connector Mounting Box for Round or Square Tube Hitches - 18159
Average Customer Rating: 4.5 out of 5 stars (97 Customer Reviews)
by: Gary08/05/2023
I had this installed last year by my mechanic along with a whole electronic brake controller and I have to say this was such a good investment. It makes the install look like it belongs. No wires handing out to get caught on anything or tangled, just a clean install. Would definitely recommend and would buy again.
by: Trey H 06/27/2016
Perfect for '08 Toyota 4Runner.
I installed a Curt receiver hitch on my 2008 4Runner and once installed it interfered the factory 7pin trailer connector. I extended the wiring harness and this mounted box worked out perfectly.
Great product!


by: Mark12/14/2018
This did the trick for me.
Just what I was looking for it fits round or square tubes.
It hides under the bumper off to the side where I want it it mounted.
110% happy with my order.
Fast shipping
Ps. A small part was missing in the box.
But After I contacted the company they sent me a new one practically overnight.
Top notch company and they stand behind their products.
You can tell by the attached pictures I am extremely happy with this product for the past year so far and
“it still looks great”.


by: Travis K10/16/2016
This installs easily and looks nice. I used it on a round tube hitch so I had to trim the plastic. That's not a problem as there is a score mark on the plastic. It cut easy and cleanly.


by: Shawn08/15/2013
On my 2009 Ford Flex. Thanks etrailer.com. Great service and fast shipping. I got my order the next day!! Way to go!


by: John05/06/2023
The strap was a half inch short of what I needed for my Curt extra duty hitch and I needed to do some extra drilling to work with the connector on my 2000 F-250. Still, not a bad arrangement. Innovative.
by: Jeremy D.03/13/2019
etrailer.com always has a solution to my trailer problems! This worked out great and is such a cleaner look!


by: Jack P04/17/2019
The perfect solution for an odd hitch. Works great looks good. See picture.


by: Ryan06/01/2019
This is an awesome piece. It was a much better alternative than a plug hanging under the bumper. It comes set up for a square tubing style hitch, but there is a notch molded in that makes it easy to cut it away for a round tube hitch. My only complaint was the hose clamp. It was not like a normal one and I could not get it to stay tight. I replaced it with a stainless one from [local hardware store] and it has stayed tight since. The other nice thing is the unit protects the rear of your trailer plug from moisture.

Ryan

6/2/2020
Still looking and working out great! So much better than one of the hanging plugs!
by: Ted P.05/01/2015
I used this to mount a 7-way connector to a round tube Curt hitch. It fit very well and is more secure than I expected. I can highly recommend this mounting box.

Ted P.
5/1/2016
Still perfect a year later!
by: Ryan D.04/16/2014
The product page says this unit is a universal fit, which is not true. It will be too big for a class one hitch. I made it work with a minor modification.
Ryan D.
4/16/2015
After a year, the straps will need tightening, as the whole thing has become loose and rattles around. I would not recommend for a class one hitch.
by: Dino02/04/2019
Love this product since this housing made sure our 7pin plug housing could be mounted higher and. It in the provided location in the hutch bracket. We used this housing so we could have it higher on the hitch so it will be protected. Live and recommend it to all!
by: John B.05/13/2013
Contrary to another reviewer, I thought the plastic to be pretty sturdy (it's got pretty thick walls). It mounts securely with the hose clamp, and gives a very clean look when installed. The recessed circular cutting guide on the inside made it easy to round out the notches to fit my round (rather than square) hitch crossbar. The only thing I had to modify was to widen the hose clamp slot on one side so I could feed some of the extra length back inside the box.
by: Tim11/08/2016
I can't review the working order of this product, because i wasn't able to use it, due to not being able to mount it in a location that worked for me. But it's a good solid product that would've worked great. And shout out to Etrailer.com, awesome website, great product information, nice selection, good prices and fast shipping. Great place to find real product reviews.
by: Daniel06/03/2018
Used in conjunction with a Curt C15302 receiver and a Pollak PK11893 7-way socket on a 2003 Chevy Silverado 2500HD. The only issue I encountered is that the stock GM wiring harness plug makes for a bit of a tight fit, and you have to force the harness into the tight space. Time will tell if it holds up.
by: Ray04/05/2020
The mounting box worked perfectly on my round tube hitch. I like that it is off to the side as it allowed me to mount it just under the rear bumper, which looks good and made it easy to route the wires up for connection.
by: Phillip05/31/2016
Bought a car with a round pipe trailer hitch but no wiring and no good place to mount the 7-way connector. We were thinking about spot welding something until I found this. Worked great, looks nice and professional.
by: norm b.07/20/2016
Fits my square tube hitch perfectly.
Norm B.
7/20/2017
Its still working fine. Thanks!
by: Larry03/31/2014
Great Product! However did have to modify it a little for my application regarding 2005 Dodge Grand Caravan. If one mounts the product as the angle is cut out. It will drag from past experience with 4 other Caravans. All you got to do is cut a square opening to fit 2 inch square hitch bar. This allows for the wires to go over hitch bar (on non exhaust side) and not under to be exposed to low clearance. This product is a great solution and mounts real easy. Puts my hook up away from exhaust. Will have picture later.
by: Pat B.12/24/2014
Very nice product that gets your connector out of the way yet still accessible. My tube type hitch was smaller than the curve after I cut out the Mounting Box following the cast contours. Still, it went on easily and should last as long as the vehicle. Plan to buy mounting screws. I don't know why they include the short ones as I've never seen a 7-blade receptacle thin enough to use the ones provided.
by: Allan Ryan05/13/2015
The Curt hitch,complete with wiring harness and the 7 pole adapter with 4 flat plug were all easy to install and conveniently available thru etrailer.com. The installation video on their web site was complete and confidence inspiring. The go to site to install it right. Thank-you etrailer.
by: Steve C03/21/2014
Very difficult to bolt the 7-connector to it, but once done it fits well and does exactly what I wanted it for. A quick dremel to cut the curve to fit a tubular hitch. Ordering and shipping was painless and fast.
by: Jeff07/05/2014
This product did not work as advertised. Install video shows to use the the bolts (screws are to short) that came with my 7 pin plug adapter by drilling bigger holes in the box. These holes ended up right next to the side walls of the box allowing NO room for the nut to fix. Had to purchase bigger screws & drill bigger holes in by plug adapter to make it work. You need to get rid of the install video.
by: Maurice04/30/2016
THIS HAS SERVED WELL BUT BE CAREFUL ABOUT OVER-TIGHTENING THE "HOSE CLAMP" TYPE BAND WHICH SECURES IT AS IT IS POSSIBLE TO DEFORM (OR, AS I DID ON ANOTHER ONE OF UNKNOWN SOURCE ON ANOTHER VEHICLE, TO PARTIALLY RIP IT).
MY BIGGEST PROBLEM WAS FINDING THIS ITEM BEAUSE IT WAS ONLY BY CHANCE THAT I ENCOUNTERED THE "MOUNTING BOX" DESCRIPTION!
by: Josh D.05/13/2014
The mounting box was perfect for what I needed. It installed easily and attached to my square hitch perfectly. It was just what I was looking for. Shipping was fast and etrailer kept me informed on delivery.
25
97
Show More Reviews
See what our Experts say about this Draw-Tite Accessories and Parts
- Draw-Tite Mounting Bracket Recommendation for a 2007 Toyota Highlander with a Round Tube HitchWhat I would recommend you get is the Mounting Bracket # 18138 that you referenced and then use the included hardware to install it onto the lower bumper on your 2007 Toyota Highlander. You would use the self-tapping screws from this kit to drill into your the bumper to attach the # 18138 to it. Another option would be for you to get a 6 and 7-Way Trailer Connector Mounting Box # 18159. This will mount to square hitches and round tube hitches like your Draw-Tite Hitch # 75153.
view full answer... - Size of Tubing Used to Construct Curt Class III # C13002The cross tube of the # C13002 Curt Class III Receiver hitch is constructed of rectangular tubing that is 2-1/2 by 1-1/2. Looking at the front face of the cross tube, the tubing would be 1-1/2 inches tall and 2-1/2 inches deep, so the # 18159 would work for you.
view full answer... - Trailer Connector Mounting Box for Round Tube HitchesYes the mounting box you have selected will work with the hitch and wiring kit you have selected. You will also need a wiring harness, 118336 or 43105, if you are not set up with a 4 pole flat connection already. In addition you will need a ball mount, pin & clip and the appropriate sized hitch ball to complete the setup if you do not already have these items. I have provided links below for your convenience.
view full answer... - Running Lights Not Working on Trailer Wiring Harness for a 2013 Honda PilotYou will need to make sure all of the included fuses and relays are installed and that none are blown. This includes the in-line fuses that are part of the harness. A blown fuse or relay could cause this problem. If all the fuses are installed and working properly then use a circuit tester like # PTW2979 if needed to test the running light pin on the 7-Way. If it has power then you know the problem is on the trailer, most likely a dirty or corroded trailer connector or bad ground at the...
view full answer... - Brake Controller 7 and 4 Way Installation Kit without the Pre-wired 7 and 4 way Trailer ConnectorWhat you can do to complete the installation of the CURT 7-Way and install a Tekonsha P3, # 90195, is to use the Wiring Kit # 5506. You would also need one 40 amp circuit breaker for the 12 volt hot lead, # PK54540. You would still follow the FAQ and video for the # ETBC7 which I have linked for you. The Adapter 4 Pole to 7 Pole, # C57674, should have come with a mounting bracket and self-tapping screws so that you could mount it to a flat surface (not the hitch) under the vehicle. Something...
view full answer... - 6 and 7-Way Trailer Connector Mount for a 2003 Subaru Forester HitchI went out into our warehouse and measured the cross tubes of both the Curt # 12038 and the Draw Tite # 36311 and found that they have cross tubes that measure 2-1/2 inches by 1-1/2 inches. I would recommend you use a 6 and 7-Way Trailer Connector Mounting Box for Round or Square Tube Hitches, part # 18159, on either the # 12038 or the # 36311. I believe that this mount would give you easier access for your trailer connector once installed. I have included links to installation instructions...
view full answer... - Will Draw-Tite 6 and 7-Way Trailer Connector Mounting Box, Part # 18159, Fit Curt Class V HitchYes, the Draw-Tite 6 and 7-Way Trailer Connector Mounting Box for Round or Square Tube Hitches, part # 18159, will fit your Curt Class V Hitch Receiver. This product is designed as a universal fit item, which makes it compatible with virtually all hitch receivers, including both round and square tube, and even the larger Class V square tube receivers such as your Curt # C15702. The 90-degree cutout in the housing will mate with any size square tube hitch and the adjustable steel ring...
view full answer... - Is There A Wiring Mounting Tab On the Hidden Hitch Like The OEM Hitch for My 2004 Lexus RX330There is no tab on the Draw-Tite, item # 75153, for mounting the wiring harness. We do carry mounting options for the wiring on your vehicle. For the 4-way trailer connector you can use theCurt Mounting Bracket for 4-Pole Flat Trailer Connector Item # C42CR. If you have a 7-way connector then you can use the 6 and 7-Way Trailer Connector Mounting Box for Round Tube Hitches, item # 18159, which works very well with the round tube hitches.
view full answer... - How To Get A Round Electrical Connector Bracket On A Round Tube Hitch For A 2001 GMC 2500 HDI can get you a round electrical connector bracket for a round tube hitch but it will not be a part of the hitch. It will have to be attached to the hitch. The hitches that I have for your 2001 GMC 2500 HD do not have a electrical connector bracket welded to the hitch. The Draw-Tite, # 75362, that you have referenced will only fit a GMC 2500 Light Duty truck, not a GMC 2500 Heavy Duty. For your 2001 GMC 2500 HD I would recommend the Draw-Tite, # 75550. It is a round tube hitch with a 6,000...
view full answer... - Recommended Hitch and 6-Way Wiring Harness for 2010 Kia SedonaThe recommended custom fit wiring for your 2010 Kia Sedona with a short wheel base is the Curt T-Connector Vehicle Wiring Harness with 4-Pole Flat Trailer Connector # C56347. This part provides a 4-way flat trailer connector at the back of your Kia to power your trailer's signal lights. It sounds like you have a 6-pole connection on your trailer so you will need the 6-pole adapter # 37175. You will be able to retain use of the 4 pole connector, and the mounting bracket is included as...
view full answer... - Connector Mounting Box for a 1995 Chevy SuburbanPart number 18159, connector mounting box, is designed to fit on square or round cross tubes, so it would work great for you.
view full answer... - How To Get A 7-Way And 4-Way Trailer Connector On A 2004 Ford F150 Heritage With Factory Tow PackageThe Tow Ready Ford Replacement OEM Tow Package Wiring Harness, # 118242, will work on your 2004 Ford F150 Heritage if you have the factory tow package with the 4-way connector already on your vehicle. This will connect inline to your vehicles wiring harness and the 4-way will stay and be able to function. So you will have a 7-way and a 4-way at the rear of your vehicle. There is no plug that will swap out on the # 118242 wiring harness that will give you a 7-way and 4-way connector side...
view full answer... - Dimensions of the 6 and 7-Way Trailer Connector Mounting BoxThe 6 and 7-Way Trailer Connector Mounting Box, part number 18156, is 5-1/4 inches long X by 4-3/8 inches high 2-3/4 inches wide and has a 2 inch diameter hole for mounting the 6 or 7-way connector. There is a cutout in the rear of the unit for the wiring to pass through when it is mounted. Includes screws for mounting the connector and a steel hose clamp to secure the mounting box to the hitch. You can see this box being measured in the attached video.
view full answer... - Parts Needed For Towing Setup For 2012 Toyota Venza For Towing Pop-Up Camping TrailerYou have done your homework and have almost everything you need. For your complete towing setup, you will need: Item # 13356 - Curt Hitch (confirmed fit for your 2012 Venza) Item # C56079 - Trailer Wiring Item # ETBC7 - 4-Way to 7-Way Universal Installation Kit for Brake Controller Item # TK94FR- Prodigy RF Wireless Trailer Brake Controller Item # 18159 - Mounting Box (optional, mounting bracket included in Item # ETBC7) Item # 989891 - Ball Mount Kit (Includes: 1 fixed ball mount, 2...
view full answer... - How to Mount Replacement OEM Tow Package Wiring 118253 on a 2010 Honda Pilot with Factory KnockoutTo secure the 7-Way connector part of the Replacement OEM Tow Package Wiring, # 118253, to your 2010 Honda Pilot, you can use the factory knockout and drill 4 holes to match the four mounting holes on the 7-Way. Use the 7-Way as a template to drill the holes. If you do not want to drill into the bumper, you can attach a bracket to the trailer hitch. You can use the Mounting Box, # 18159. This is a simple no-drill, universal application that includes a clamp to attach the bracket to the...
view full answer... - Do you Carry Hidden Hitch Mounting Bracket for a Round Tube HitchWe carry the same part, but the part number is a bit different. The 6 and 7-Way Trailer Connector Mounting Box for Round Tube Hitches is listed on our website as part # 18159.
view full answer... - Mounting Bracket Adapter to Draw-Tite Hitch # 75155The Hopkins Plug-In Simple Vehicle Wiring Harness for Factory Tow Package - 7-Way and 4-Flat Connectors # HM43374 will use a standard bracket like the one that came with it. This is a standard fit if you use a bracket like # 18140 or # C57202. The mounting bracket on your trailer hitch receiver # 75155 is a fit for the factory wiring harness only as you can see in the attached video. Other options are the # C58000 and # 18159.
view full answer... - Trailer Wiring Mounting Options for Curt Trailer Hitch # 15601 on a 2010 Ford F-250For the Curt Trailer Hitch, # 15601, for the 2010 Ford F-250, we have several trailer wiring connector mounting brackets that you could use. First, for a basic 4-Way flat, you can use bracket # 18144 and No-Drill Mount Bracket, Short, # 18140, or No-Drill Mount Bracket, Long, # C57202. For a 7-Way, you can use either the short or long No-drill bracket, mentioned above, and Mounting Bracket, # PK12711U. Another option for the 7-Way would be 7-Way Trailer Connector Mounting Box, # 18159....
view full answer... - Trailer Wiring Mounting Box for a 2004 Jeep Grand Cherokee and Curt Trailer Hitch 13051If your 2004 Jeep Grand Cherokee has a 4-way flat trailer connector then for a mounting brackets there are a few options. You could start with # 18144 to hold the 4-Way and then attach it to either short bracket # 18140 or long bracket # 18136 which attaches to the hitch. If you need to mount a 7-Way I recommend bracket # PK12711U again with short bracket # 18140 or long bracket # C57202. If you need to add a wiring harness there are several options depending on how your Jeep is equipped...
view full answer... - Location of Curt Hitch C15302 on a 2003 Chevy Silverado 2500 Short Bed and 7-Way Mounting BracketWith Curt Trailer Hitch Receiver # C15302 installed on a 2003 Chevy Silverado 2500 short bed the hitch will be in the same position as a factory hitch or at least within a fraction of an inch. By that I mean the receiver will be right under the rear bumper. To mount your 7-Way connector I like mounting box # 18159 for a clean look. I have linked a video of it for you. I have included a link to all of the 7-Way mounting devices we have.
view full answer...
- Parts Needed to Tow a Trailer with Brakes 2015 Ford Transit T350The Curt Trailer Hitch Receiver part # C13193, Tekonsha OEM Replacement Vehicle Wiring Harness part # 22116, and Tekonsha Prodigy P3 Trailer Brake Controller part # 90195 are all confirmed fits for your 2015 Ford Transit T350 and will give you everything you need to tow a trailer with brakes. In order to mount the 7-way trailer connector to the trailer hitch receiver I recommend using the 7-Way Trailer Connector Mounting Box part # 18159 which does not require any drilling. The hitch...
view full answer... - Recommended Mounting Bracket for Curt T-Connector 7-Way on a 2013 Nissan XterraI do have a solution for you but when I went out to the warehouse and tested the Curt T-Connector # C56226 with the 6 and 7-Way Trailer Connector Mounting Box # 18159 that you referenced to find that they actually aren't compatible due to the mounting hole locations on the Curt 7-Way. Instead of the Draw-Tite mounting box I recommend going with the Hopkins Universal Mounting Bracket # HM48625, which has a variety of mounting holes that will line up, and the No-Drill Mount Bracket # 18140....
view full answer...

- 7-Way Trailer Connector Mounting Bracket for Curt Trailer Hitch with 3 Inch Square Cross TubeI spoke with my contact at Curt and trailer hitch # C15324 has a 3 inch x 3 inch cross tube. The mounting bracket # 18159 would be the best options since it does not reach around 3 sides of the tube, just 2. I have linked a video showing installation to the right.
view full answer... - 7-Pin Connector with 2-1/4" Mounting Holes to Fit the Draw-Tite 7-Way Trailer Connector Mounting BoxFrom what I could find on your Pollak PA66-GF30 it has mounting holes that are spaced 2-1/2" apart, while the 6 and 7-Way Trailer Connector Mounting Box # 18159 has spacing of 2-1/4" and 1-1/2". For a 7-pin connector that has 2-1/4" and 1-1/2" spacing, you can use the Pollak Black Plastic, 7-Pole # PK12-707E.
view full answer...
Do you have a question about this Accessories and Part?
Info for this part was:

Expert Research:
Robert G

Expert Research:
Patrick B

Expert Research:
Jameson C

Expert Research:
Adam R

Video Edited:
Mike H

Video Edited:
Sue W

Updated by:
Laura H

Updated by:
Wilson B

Updated by:
Hannah L

Video by:
Dustin K

Test Fit:
Shane T
At etrailer.com we provide the best information available about the products we sell. We take the quality of our information seriously so that you can get the right part the first time. Let us know if anything is missing or if you have any questions.
Product Experts Available Now!
Call 1-800-940-8924
Jack P.
4/18/2020
Has worked well. The only real solution for this difficult hitch structure on this Lexus 400h.